Sunday, February 27, 2011

Day 22. . .

Today is Day 22 of my headache!
That's right - 22 days straight with a headache! Okay that is not entirely true - I was headache free this past Monday. Friday (day 20) I went to the Dr for it - a miracle for those of you that know me - I HATE to go to the Dr.
Diagnosis. . . "I have no idea what is causing your headache"
So they give me 3 different meds to try to see if any of them help. If they do not help I get to go in for an MRI (do you think they will actually find a brain in there?)
Today as I was showering, I was praying and thinking (I do my best thinking in the shower) and I realized that my headache started after my room remodel. So I grabbed my calendar (after I dried off of course) and started looking (I write down all of my bad or constant headaches). Sure enough, I had a headache 2 days after my built-in was installed, after I had done all of the sanding etc to it. Then again the day after I loaded everything into my room. Then again the day after I spent a power day in my new studio working on my YITL project. And these last three weeks I have spent every night in here after the girls go home and during their naps, and every weekend working on class samples and kits etc.
So, what is it about the new built in? After talking to a friend about my theory and looking online, the materials my beautiful, new, built-in was made from is full of formaldehyde!!! I am VERY chemically sensitive and have to use products with no perfumes or dyes etc or else I get terrible headaches and feel sick. I do not know why it took me so long to figure this all out? After all I know this about myself and I could smell the "wood" every time I came in my studio or walked past it in the hall. But it wasn't a "bad" smell so I guess I never thought about it.
Now what do I do????? It's not like I can just take it out - it is after all "built-in" and I really like it and I paid to have it built. There has to be a solution - right? Well there is. How do you get rid of the formaldehyde? Ventilate the room, and paint the built-in. The paint is supposed to seal the formaldehyde in.
Next problem, it can't just be painted. It needs to be primed first with a product called Gripper Grey by Glidden - a product I can't use because of my sensitivity. So, tomorrow after a long day at work my dear Gary will be coming home to caulk and prime my new cabinetry. Then on Tuesday he will come home to paint it all. He is NOT looking forward to this at all! But like he said, he promised me he would get it all painted after Super Bowl was over.
In the morning I will get things cleaned up in here (I have been busy working on a class sample using the new Le Cirque papers from G45 and it is everywhere and I love it!) and then I will start the process of unloading and prepping things for Gary to do his magic. Hopefully all of this will work and my headache will be gone by the end of the week. Keep your fingers crossed for me!
I hope you all had a fun and creative week and wish you another one this week!
Toodles

Friday, February 18, 2011

Another Project from the New Studio

Who doesn't love fairies???? This is just a sweet little envelope book featuring G45's Once Upon A Springtime papers. What a fun way to document Easter this year or just Spring and all of it's wonder. I will be teaching this project on Friday March 25th at the Creative Quest. And it will be in the store to see in person as of tomorrow.

Click on picture to see all of the details!

Enjoy your weekend and do something creative!!!!!!

Toodles!


Thursday, February 17, 2011

Working in My New Studio

I gotta say I LOVE working in my new studio!!!! Here is a new project I just finished. . .

Click on the photo above for more detailed photos
This is my class sample for March 12th. I will have it in the store this weekend if you want to see it in real life. There will only be 9 spaces available for this class.
Well, I have little ones running around so I better get going. I hope you are all having a FANTASTIC day!!!!!!
Toodles

Wednesday, February 2, 2011

I'm Finally Ready To Share. . . .

So - the studio is not completely finished but it is looking pretty good! And I figured it was time to share some pictures - probably TOO many pictures - but oh well. So, let's start the tour. We will begin with a few "Before & After" shots.

The Studio as you enter BEFORE. . .
The Studio as you enter AFTER!
The Studio's "Creative" side BEFORE. . .
The Studio's "Creative" side AFTER! The Studio's "Business" side BEFORE. . .
The Studio's "Business" side AFTER!
I have to say that I loved my room before - I loved having my own space and a place just for me to create without being in every one's way. But it was never "pretty" and it felt like a runway. It seemed so narrow and small. But now with the new paint, the built in and all of the trimmings it feels bigger and finally it's "pretty"!!!!
Those of you that know me, know that I am a pretty "black & white" kinda gal. I love the contrasts and the strengths that both of these "colors" offer. So I decided that my room would be ALL black & white - no accent color at all! I am also a huge fan of damask & Fleur dis les, so I filled my room with those as well.
I painted 3 of the walls black, but left the one wall on the "business" side white. I did it for a couple of reasons, but mainly for my Mom who hated the idea of black walls and she sits here to use my computer. I figured this way the wall she would usually look at would be white and she could "pretend" the rest of them weren't black.
I added beadboard to the backs of all of my hutches and then Ken topped my built in with beadboard as well - it looks pretty cool!
I have double doors coming into my room and I love the way the 2 white doors look on the black wall.
I kept the basic concept of my "zones" like they were before, but I did change the locations of some of the pictures etc.
Just look at how pretty this looks! I can't wait to start creating in this room!!!!
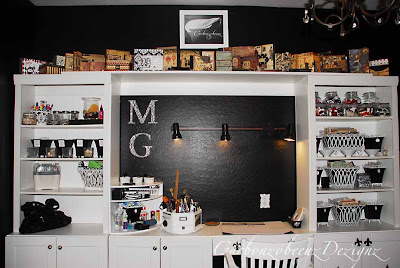
This is the built in that Ken built for me. I designed it to fit my needs and my junque. I LOVE how it turned out! It still needs to be painted and caulked but that can't happen for a couple more weeks and I couldn't live with all of my stuff all over the dinning room any longer! This gives me not only great looking storage but also quadruples my working counter space in the room. Now I can keep my Cricut plunged in and ready to use all of the time and I no longer have to squat on the floor to use my cutter. Thank you Ken - I LOVE IT!!!!!
I am a big fan of binders and of course I had to recover all of them to match the room.
As you can see I have LOTS of them!
These are some of the metal baskets that I altered. They hold most of my embellishments. I always leave one empty shelf or drawer when I reorganize so that I can still "grow" in my room. So this is my empty shelf. I am sure it won't be empty for long though.
Here are more of my altered baskets and my jars. More embellishments in the metal baskets and my ribbon in the jars.
I got rid of most of my plastic (you should see it all in my garage!) but there were some pieces that I really wanted to keep because they work well for me. I had Ken build this to fit these particular pieces as well as my 15 black photo boxes. But I did spiff the plastic up quite a bit by adding a mix of 3 different damask and striped B&W papers to the fronts. This is an easy thing to do to add a custom look to generic plastic and it also hides all of the clutter that usually lives inside the plastic! And it also gives you a great place for a label - you know I love my labels!!!!
This is one of my favorite calla lily photos that I have ever taken (I took it in feb 2005) it is also what is on my calling cards and I used them to color match my black paint for the walls. So I decided to print this out as 11x14 for my studio - I love it!!!!
I also used it on my tool spinner with my favorite quote. This quotes has hung on my bulletin board on a scrap of paper for almost 10 years. I decided it was about time that I do something better with it. (Your talent is God's gift to you. What you do with it is your gift back to God.)
This is my new punch storage - they are just brushed nickle cafe rods hung on the wall. The large punches just hang right on the rods. Easy to get to, and easy to see what I have. My little ones are still in a drawer. Thanks Ann for hanging my rods!
MY "M&G" have been painted so many colors and have had so many different papers on them through the years. They got another coat of paint and another layer of paper. I plan to add some rhinestones and flowers to them too - but for right now they will just have to stay like this. This is also my corner unit I got on clearance for $3!!!!
Just a close up of the paper covered plastic drawers and my photo boxes.

This is my "Grandmother" Frame. It's about 36" wide and I took out the glass and the back, spray painted it a hi gloss white and hung it on the wall. Then I hung eight 5x7 borderless frames inside it. Right now those frames just have paper in them but soon they will be filled with pix of my granddaughters.

And here is my cool black chandelier that Gary bought me for Christmas.

So this is my new, BEAUTIFUL studio! This is what I have been spending this past month on. There has been hours of sewing, painting, purging, cleaning, moving and so much more. But it has been worth EVERY minute! And I am so thankful to everyone that helped me make my dream studio become a reality! Thanks for taking a look and sharing my joy!

Toodles