Thursday, August 2, 2012

I've Been Busy

Oh My - let's see, what have I been up to lately. . .
Well all last week was full of making birthday party decorations for the girls. Their birthdays are a week apart so they share a party. This year's theme was Lalaloopsy. Are you familiar with these dolls? They are something else, but the girls are madly in love with them. So there were tu-tus to be made and TONS of buttons to be sewn onto things. Then there were the crayon boxes that needed to be made and filled. But it all got done and was very cute and colorful!

Last Thursday was an eventful day around here - it was Bugs 2nd birthday! It was the last day I had the girls. Bryanna will be a SAHM now! And Gary bought a new truck! He really needed it but it was not a planned purchase. Typically I would have photos to go along with my words but these days I have been a little laxed about the camera. This is NOT typical for me at all. Not sure what's going on there???

Saturday was a birthday party for Gary's birthday out in Scottsdale and then Sunday was the Lala Party for the girls. It was a busy weekend but lots of fun. Again I was bad and never got my camera out! What is my problem?????

On one of our birthday party supply shopping trips, Bryanna tried to help me pick out fabric for my curtains in my new studio. Each fabric she picked I said no to. Then she picked this red and tan homespun fabric. It wasn't my favorite but I didn't hate it and I really didn't want to say no again. What the heck it was only $2.50  a yard. Well I made the curtains and I HATE them!!!!!I feel as though Ellie May Clampet and some of her critters are gonna come visit me at any minute.

 I was telling my friend Ann about them and she suggested some Graphic 45 fabric - what a smart idea!!! It is just the feel I was looking for. So that day while I was still on the phone with her I ordered this fabric. . .
 Do you recognize it? It is from the Communique line (one of my favorites) it was shipped yesterday and I can't wait to get it and start sewing!!!

This week since I don't have the girls I was able to get some cleaning done some errands run and even some work in my art journal. I love working in this. I of course love the process of the art its self, but I also love the experimenting with the paints, inks and supplies. I love finding images that tell the story I want to tell. And I love having the freedom to tell a story, express some feelings, ask some questions and have it not just be words written on a page.

This is the opening page to my journal (I tend to work out of order). It says "Pondering who I am & who I should be? There is a list of words along the right side that describe who I am or who I think I should be. I am not thrilled with the white marks I made all over it but I am glad I gave it a try. I am glad I stepped outside of my comfort zone. I even tried my new water colors on this page.
 This is a page I started late last night and finished this morning. It is a page about my Doodle. Today is a bitter sweet day - it is the 21st anniversary of his death and also my Monkey's 5th birthday! I like  to do something on his birthday or on this day to celebrate his life each year. This year I was on the beach for his birthday so I spent this day with him in my journal.
The page is called "What Would You Look Like Now" I used a photo of him as well as a very distorted photo of an old man sitting on a wall at sunset to tell my story. I even used my own handwriting on this page (something I hate but and trying to embrace) I used a white Uniball Signo pen to write with. What a GREAT pen!!!! It never skipped once, it didn't smear, nothing! If you are looking for a good white pen I highly recommend this one. You can get them at the Occasional Artist.
 I also scanned in his obituary from the newspaper and made a collage of the text to use as some background texture. I noticed some info in the obit was wrong which surprised me that I had never noticed it before. I tore out a heart from the collage and highlighted his name and mine with some water colors.
 Here's my Doodle and a shot of the old man image - the image is used three times on the page to represent that he was a part of my past, my present and my future. I don't believe that Love ever dies. And even though he is gone, his love is not!
 This is the collage I made from the obituary. I turned it all different ways for interest. I am telling you all of this to give you some ideas to use in your journals to make them more personal (and to save a little $$$ too)
Well, I hope you have had a good week and have gotten to do something you love !
Till we meet again. . . .

Monday, July 23, 2012

More Art For My Studio

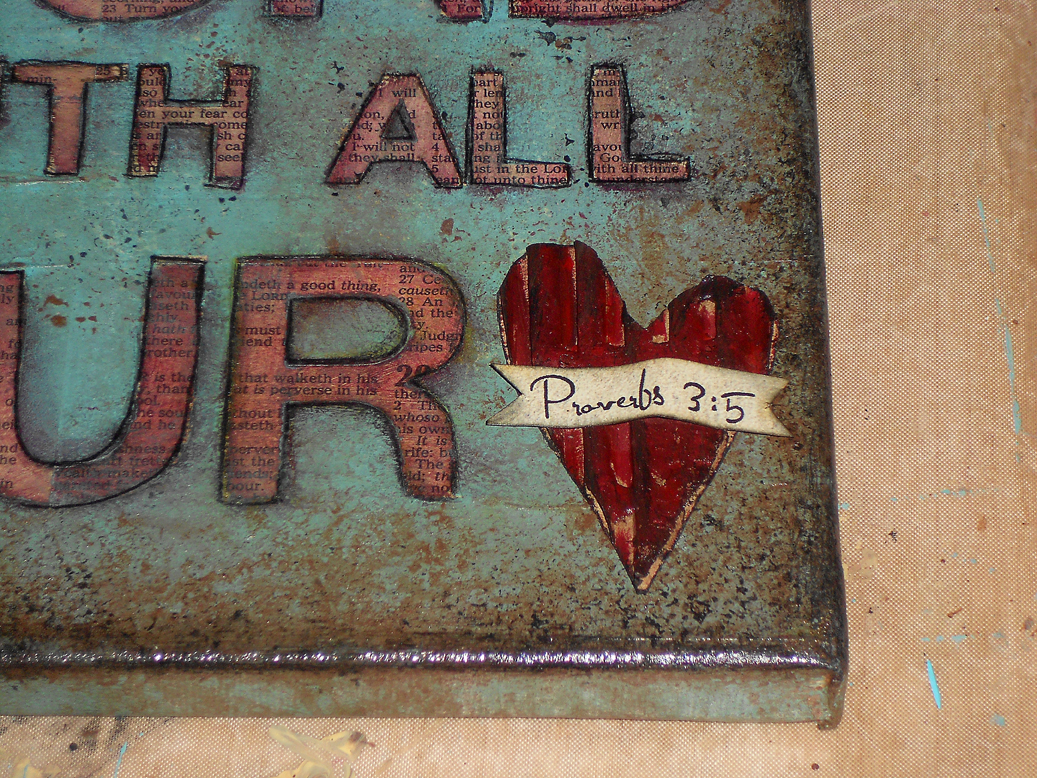
Last week I showed you the beginnings of a canvas I was working on - my fist project in my new studio. Well it is finished and hanging on the wall above the closet doors so I thought I'd share it with you. . .

 I really wish I could have gotten a better picture of it - I just love the colors! But I just couldn't make it show up in the photos. You get the idea right?
 I added a scrap of cardboard that I tore into a heart and painted then added a printed banner piece for the scripture reference.

This next piece is one of my favorites so far. It is my all time favorite scripture and I have leaned on this promise a lot in my life! This weekend I made it into a piece of art that I can see everyday and be reminded of this promise! I wanted it BIG so I made it fit on three 12x12 canvases. This is my take on the whole subway art thing. . .
 This is canvas # 1
  This is canvas # 2
  This is canvas # 3
 And this is the whole piece laid out together.
 I wanted the piece to have almost an industrial feel to it so I added small nuts with bronze brads through them along the borders of the two colors. I also added two of these crosses from Hobby Lobby on the first & third canvases.
This is what it looks like hanging on the wall over the refinished entertainment center and my handmade books. Sorry it's not the best picture - but it really looks great inhere and I am so happy with how it turned out. I would be happy to share the files with anyone that would like to make one for yourself. Just contact me and give me your email address.

Some of you may have noticed that all of my latest canvases are all scriptures from the Bible - you might be wondering why? Well it seems that God is taking me on a little journey these days. A journey of faith, trust and healing. And for the past few weeks I keep having certain scriptures being brought to mind. I just keep saying them over and over in my head. So I figure they are part of the lesson I am supposed to be learning. I have also been "drawn" to get them out of my head and onto some sort of art so I have tried to be faithful and get them done. I must say they are a comfort as I look around my new space and see all of the promises God has made to me. So  I will continue to make art with His words as long as He directs me to. And I will continue to share them with you all here.

I hope you all have a fantastic week!
till we meet again. . . .

Thursday, July 19, 2012

Making "FRIENDS" Available to More of You. . .

There is a waiting list for this class on Saturday (July 21st) so we have decided to offer the class twice on Saturday. So if you are interested in making this beautiful canvas please call The Occasional Artist by noon on Friday. There will be another 4 spaces available! Don't be left out in the rain on Saturday - the monsoon is in full force here in the valley and we are expecting a yucky & rainy weekend. Come join us for some art, fun and A/C!

Second class is from 2-5:30pm. Cost is $35
See ya there!


Tuesday, July 17, 2012

Art Inspirations

As most of you know I have recently fallen in love with mixed media and art journaling. It has become a exciting, new way for me to express myself. Although art and words have always been a huge part of my daily life, this new medium has touched my spirit in a way none of my other artistic endeavors have.

I have started collecting images online to help me express my thoughts and emotions on my canvases and in my journals. Sometimes it is quite the struggle to find that "perfect" image to depict what I am wanting to share through my art. So I decided that I would share them with all of you here on this blog of mine called "Art Inspirations"

I will probably not be sharing any of my own art there or telling stories about my life here.That is what Spillin The Beenz  is all about! Instead I will be storing these things that inspire me in my art. Hopefully they will inspire you as well. I hope you will enjoy checking back there often for new images, new inspirational quotes and scriptures.

The Reveal

Well the HARD work is over - now it's time to do the FUN stuff! You know, all of the decorating, the finishing touches and the things that make it personal. But until all of that is done I thought I'd give you a look at how it is all coming together.

So this is the view as you enter the room.
(finishing touch needed: new window treatments)

 Once you come around the corner as you enter the room
(finishing touch needed: artwork on the wall)

This is my work table
(finishing touch needed: more artwork)


This is the view from my work table - thankfully the table is set where I don't have to look at myself in the mirrored closet doors! I didn't take photos of the inside of the closet - nothing but plastic bins in there. (finishing touch needed: artwork over the closet doors)

My "bookshelves" I was able to cut back on alot of the metal baskets and glass jars in the new studio. (finishing touch needed: paint all of the metal baskets - the white is too stark)

Here's the hope chest all finished. It holds all of my art journal and canvas art supplies. The boxes underneath are full of my cricut cartridges.


This is the little cabinet I painted - love my cricut sitting on top. Inside are more cricut things. (finishing touch needed: hardware still needs to be attached - waiting on hubby)


This shelf was already in the room - it now holds my wood mount stamps that are not part of sets.

Another view of my work table as well as my large punch storage - I love them on these rods!

My handmade books on top of the entertainment center. The doors opened to show some of my paper racks.

Great storage in the drawers in my entertainment center. I have been saving these tea tins for "something" for about 18 months. There are 15 of them in this drawer - perfect fit and great organization!
 the boxes in this drawer are left overs from a class last year - almost as perfect as the tea tins. But the best part was spending NO money!

Cool new "vintage" baskets from The Occasional Artist. I love them! Perfect for holding books and magazines as well as my journals & sketch books.

Now that the room is all put together I decided it was time to try it out. So tonight I am working on another canvas - some much needed artwork for the walls of my new studio!

It is in a drying phase right now so  I decided to pop on and share my room with you all.
It's dry now so I gotta run - I will be back soon to show you the finished project.

Till we meet again. . . .

Tuesday, July 10, 2012

My Class this Saturday

I just thought I'd let you know that I had a couple of spaces open up in my "Shabby Journal" class at The Occasional Artist on Sat (july 14) from 1 - 5pm. So get out of this horrid heat and come have fun with us! Give the store a call if you want one of these available spaces.


Well back to varnishing. . .
                            Till we meet again

Another Update on the Room

So today I decided it might be kinda fun to line the inside of my hope chest with some vintage book pages. I love how it turned out - just wish I hadn't rub out of pages. Now I need to come up with something cool for the lid. Any ideas????

 I also got busy on my letters - I tried a new technique I saw on Pintrest (gotta love pintrest!)to add a peeled paint/distressed look. It was very easy and I loved it - gonna do it again sometime soon.
 Just in case you want to try it, here's how you do it. Paint your letters a base color - I used a medium brown on mine. Once the paint is dry, rub a bar of Ivory soap (it's gotta be Ivory or Dove - something that is pure soap)in the areas that you want distressed. you can see it above on the 5 brown letters.
 Next paint your top color - I used a red on mine. Once this coat is dry sand off the paint in the areas you applied the soap.
 Once I was done I mixed up a black paint and water mixture, I painted the whole letter with it and then wiped it all off. It stays in the crevices and just adds to the aged look.
 Once my varnish arrives I will add a coat of that before attaching them to the front of the hope chest.

I also got a really cool and FREE chair today!!! It matches everything perfectly! I will be reupholstering the seat as soon as I find the perfect (and maybe free) fabric.
So that's where we stand with the room now. I am getting so excited to see it all finished and even more excited about working in my new studio!

Till we meet again. . . .